Friday 30 April 2010

Corfe Castle and Choo-Choo Trains

Hi, sorry I've been a bit absent from blogland again. Been busy with work, which then meant the housework piled up and had to be dealt with! Tonight I'll catch you up on some photos of my daughter, and tomorrow I'll post a few creative pics. I'll leave my pocket-sized plans until Monday as I haven't managed to tick many of the boxes yet!


Last week I took my little girl to Corfe Castle. It's a fabulous ruined castle that stands at the top of a mound, which itself sits in a dip of the Purbeck hills. It's just down the road for us, about 10mins away, so we go there quite often just to walk around the castle perimeter up to the village - it's a pretty little track where you can spot birds and creepy crawlies, and if the stream is full enough you can play pooh sticks on the footbridge! My daughter loves it there, she especially likes peeping the castle through the car window on the road there, and then spotting it though the trees on the walk up.

(pooh sticks)

However, we rarely go into the castle grounds, as it's national trust and we can't afford to pay the entrance too often. Every now and then it's a treat to go into the grounds, where she climbs the hillocks and rolls down them, walks up and down the many stairs, and we eat a picnic out on the lawn. It was even more of a treat last week because we took the bus there by ourselves (another expense I can't afford too often - £5 return for a ten minute drive? seriously?) She sat very nicely on the bus and pointed at things out of the window - when the castle appeared she screamed excitedly: "THERE'S THE CASTLE - THERE IT IS!!!" making everyone on the bus chuckle!

We went in the visitor's centre for a bit, because though it's mostly beyond her at the moment I like her to get used to being in a museum/learning type environment - and they have cool magnetic wall puzzles she can play with!


Unfortunately, by the time we got up to the castle the wind had picked up and the sky had clouded over, and we had another dissapointment - the dragon had gone! My friends had taken my daughter to the castle a couple of weeks before, there had been a dragon built from withy sticks and things, and my daughter kept mentioning 'the dragon at the castle'. So one of the reasons I wanted to take her was so I could see the dragon I'd heard so much about, but he'd been de-constructed (or he'd flown away!).

Because of the cooler weather we did quite a quick walk around, and we didn't stay to eat our sandwiches like I'd planned. We still had fun though, including my daughter saying 'pop,pop,pop' on each step all the way down, because I made the mistake of saying it once at the top (I don't know why?).


We came back to Wareham and ate our sandwiches by the river - feeding our crusts to the ducks afterwards!

So that was our big adventure recently. We've not been out much since, except to the library, because little girl has had a cold. We ventured into Poole today though - luckily my friend Rosie accompanied us as it made the train journey a lot more fun!


Did a bit of shopping and got very tired, was glad to get back home and chill out this evening!

I'll be back tomorrow with some crafty stuff ~ see you then!

x

Tuesday 20 April 2010

Getting my priorities right! (pocket-sized plans)


So, off my list of things to do last week, I managed to:
  • Update my blog header and background
  • Prep my scrap-stuff / desk for Shimelle's crop party
  • Make my sister-in-law a birthday card
I did not manage to:
  • Clean out the cupboard under my sink
  • Vacuum pack our thick winter jumpers and put them in the loft
What does this say about me??

Actually, I'm really pleased that I put crafting above housework for once. I was determined to take part in Shimelle's crop party as much as I possibly could, and with 3 cards and 5 layouts made in one weekend, and a fresh blog look, I think it paid off. Especially as I just found out I won a set of Banana Frog stamps for making this card (the winners were randomly chosen out of the entrants to each challenge). Yay! Can't wait to receive them!

Now, I know I can't ignore the housework all the time, or I'll end up living in a pigsty, but I definitely want to prioritise crafting more often from now on. I feel more productive when I focus on 'creating' for a couple of days - things come together more easily, meaning I enjoy the process more. So thanks Shimelle for giving me that push to devote more time to it.

My pocket sized plans for this week are to:
  • Clean out the cupboard under my sink
  • Vacuum pack the winter jumpers
  • Create an online gallery with photobucket, so that my layout pics can be viewed at a better quality. I had to use photobucket this weekend to sort out the divider between my posts, and it forced me to start using the service, which I'd been a bit lazy trying to understand. I don't know why I haven't done it before. It looks easy enough really. We'll see if I still think that next week!
  • Help my little girl to make a money box out of papermache
That will do for this week, as I'm working tomorrow and all weekend. But I shall try to squeeze in a layout or two if I can!

Today we made a magnetic fishing game, by punching eye holes in fish cut from thin plastic, putting paperclips through the holes, and then using a magnet tied with string to a short bamboo stick as a rod to catch them. They were 'swimming' in a large flat tuppaware box. I got the idea from a book called 'Cool Spaces for Kids' by Sam Scarborough (a book which is beautiful but makes me jealous that I don't have a big garden or own my own house).

My daughter loved the game, though the magnet kept falling off the string (I had been too impatient to glue it) so mummy got bored of the game quite quickly, as I had to keep tying the magnet back on! (we had been playing dress-up too, which is why she's wearing a very dashing flowery waistcoat):


I need to glue the magnet to the string so we can play it again, it will be a great game for in the paddling pool in the summer!

I'm off to catch up on reading other people's blogs, instead of typing away at my own...

x

Monday 19 April 2010

My five favourite layouts

Shimelle has asked: what are your 5 favourite layouts you've created? And why?

It was difficult to choose, and I'm sure my favourites change day by day, but here's the ones I've picked for now:


- because it's whimsical and romantic and just a bit silly: how I like to remember my wedding day!


- it was a struggle to get this layout looking right, and I really love it now it's done. It fits the mood of the day really well, and I like the title which came to me in a burst of inspiration after being stuck for a while!


- this one is special to me at the moment because my sister is planning to go travelling for a year-and-a-half soon, and I don't want her to go! I'm gonna miss her so much!


- this photo is the first pic we took of my daughter, so the photo is super special to me. And I like the layout because it's probably my only one with a simple style and clean lines - the photo was so special to me that I didn't want to overwhelm it with fuss and embellishments.


- this photo of my daughter really shows her fun loving personality, and every time I see this layout my heart bursts with love for her. It was emotional scrapping it because I was trying to put all my love into the page for her to understand how I feel about her when she's old enough to appreciate it. My friend Rosie says she loves the fact her Dad sketched her when she was small because it shows he cared enough to spend that time and to really focus on her, I hope my scrapping will show the same to my little girl.

x

My little monster!

Loved this challenge from Shimelle: to create a project using SJ's Little Musings. I love SJ's blog, and I had downloaded a friday freebie of hers a while ago, printed the photos to scrap with it, and then never got round to it. It's great to get a layout out of your head and onto paper!


The journalling reads:

My daughter gets into everything!!
She constantly suprises me with the things she does. She's inventive and adventurous, with a cheeky smile!


I hope SJ doesn't mind that I played around with her drawing, changing it from a little boy called Finn to look like my daughter instead. I also added a nose, because though I think all her musings are super cute, the fact they have no noses freaks me out a bit!

The monster stickers are papermania, I bought some cute robots at the same time which need a project. Can anyone think of a layout theme I can involve robot stickers in?!

x

Sunday 18 April 2010

hugs, cuddles, kisses

I've used a few stamps on this card: two Anita's, one Kolette Hall, and one Studio G. I'm thinking the card might be for my hubby for our anniversary in May, or it might stay hidden until next valentines day (how's that for forward crafting?!) I just hope he doesn't suddenly start reading my blog and see it in the meantime!


I had a minor disaster with the hugs, cuddles, kisses stamp as it smudged all over the place, I had to turn over the piece of card to use the other side. Trouble was, the other side had a mark on it. So I punched some little hearts and used them to cover it up. Hey presto, problem solved!


I even stamped the sentiment inside, so this definitely fits into Shimelle's challenge to use stamps on a project!


I'm getting sleepy now, won't be able to do much more posting before bedtime!

x

Bokor Hill Station

Okay, I admit it, I got out the old heat gun to speed up my paint drying! I have always liked the effect of paint splatter on other peoples layouts, but never quite had the confidence to try it out on my pretty patterned papers. For this layout I had to give it a go though, and I love it. It just gives the page that extra depth. It also really adds to the rough, decaying look I was going for to match my story about this lonely town in Cambodia:


The journalling reads:

Bokor Hill Station, a remote town in SW Cambodia, was only properly inhabited for about 20 years. After that, wars meant it was mostly evacuated, and the Khmer Rouge used it for a stronghold from the 70's to the 90's.

Now it's completely abandoned. When we visited it in 2006, people warned us it was spooky, but when we arrived there were clear blue skies and the place just seemed lonely and sad.

Then a ghostly mist rolled in. We were exploring the empty rooms of the main building, the Bokor Palace Hotel and Casino, and it felt like we had to be silent and respectful of this town's unhappy history. When we glimpsed each other's silhouettes through the gloom it gave us a shivery feeling.

I've just read online that they are beginning to redevelop this place. It would be strange to return and see it full of life.


I was really pleased to find this 'Aged and Confused Vagabond' 'Green Bean' Basic Grey paper in my stash. It's perfect for echoing the peeling red paint on the buildings in the photos, and it's got the distressed look. I worked this even more by distressing right around the 12x12 page and then inking it with a rusty colour pad. The other papers used are My Minds Eye 'Wild Asparagus' 6x6 papers, and the heart is a photo of some graffiti that was on the walls of one of the buildings.

So there we go, my entry for the scrapping with two 4x6 photos challenge. Though I think my photos ended up slightly smaller than 4x6 as they'd been printed with a border which I sliced off. Hope it still counts!

x

Special wishes scraps card

One of Shimelle's challenges is to make something using only scraps from you recent projects. Even though I've been crafting lots this weekend I didn't have a huge amount of scraps, as I'd been mainly using paper leftovers anyway! I did, of course, have a few though, so I managed to put together this A6 card:


Everything was scraps from stuff I've made this weekend, except for the sentiment, and the brads which were leftover odds, but from older projects.


The flowers were made following Clair's tutorial over at Obstinate Pursuit, see her post about them here. It's a great way to use up bits and pieces of paper!

I'm now just waiting for some paint to dry! It's for my attempt at Shimelle's challenge to scrap two 4x6 photos, so keep an eye out for my layout later today.

x

Saturday 17 April 2010

Adorable


Here's my layout for Shimelle's Cosmo Cricket challenge. I don't have any Cosmo papers but I really like her 'what we loved about this trip' page, so I have scraplifted quite a few things from it, including the bright colours, the numbers across the top and in list form, some cloud detail, some flower embellishments, a multicoloured title, and the sketch! Phew! Hopefully my page still stands out as mine, despite all this lifting! I guess that's the point of the challenge but I've never tried scraplifting before so it's a new experience for me!

I bought these cute animal number stickers from Woolworths when it was closing down and hadn't used them yet, they were perfect for this project:


I really latched onto the numbers from Shimelle's layout, because I had been wanting to scrap this photo but not known what to say about it, and listing some of the little things that make my little girl so adorable was a good way to give the page a theme:


It took me a while to find letters for the title, and then I eventually went back to these felt letters which I'd discarded as there was no L left - I suddenly realised I could cut off a bit of a capital T and make it work!


Seeing as this is a post about my adorable daughter, and some of you might be worrying that I'd ignored her all day seeing as I said my babysitters had gone away, here's a few pics of today to prove she hasn't been neglected! Okay, she's been getting a little less attention than normal whilst I've been scrapping and blogging, but I think she's been having fun doing her own thing!


Building sandcastles, blowing bubbles and getting messy with paint - what more could a two year old want?

She's also been copying me by cutting up bits of paper and sticking stickers all over the place, the cutest was when she asked me for a ribbon, because she saw me sticking letters to ribbon for my bridesmaids layout. I gave her a pink piece and she stuck hearts all along it. Definite scrapbooker in the making there!

Night night! x

new blog look

Some of you have already noticed my new blog look! Something else to tick off my 'pocket-sized plans'!

The background and post divider are from shabbyblogs.com, and the base for the header is from thecutestblogontheblock.com. It took me a while to find stuff I really liked - I'm gonna have to work out how to make my own from scratch one day! I wanted the colours to be bright and summery as it wasn't cheerful enough before, and therefore wasn't really following my 'word' for 2010 - VIVID!

Thanks for the comments already saying you like it, it's nice to know the time spent fiddling with it is worth it! It has also led me along to a pocket-sized plan for next week - I'll let you in on that one on Monday!

Right, now I have to choose whether to scrapbook some more for Shimelle's crop party, or to tick off another plan by cleaning out the cupboard under my sink... which do you think sounds like more fun?!!

x

Let's get together


Shimelle's challenge at 10pm last night was to create a project using bunting. I'm loving bunting right now, have been seeing it everywhere in the craft world and beyond, but I'd yet to take the plunge and use it myself, so thanks Shimelle for giving me the shove!

I have a huge (gigantic) pile of wedding photos to scrap, and as it's nearly 2 years ago that I got married I'm thinking it's about time I started working through it! This photo is the group wedding shot so I wanted the page to be extra special. With that in mind I used a piece of patterned card that I'd been saving - 'Wedding Romance Glitter Paper' by K & Company. You can't tell very well in the photos but the leafy swirls in the background are all glittery and delicately pretty. I think it's great as a lovely background, but I'm a tad annoyed as I forgot to gut the card behind the photo so it's wasted!


I had a sticking point halfway through the project, when I'd layered the photo onto card, added the 'lets get' lettering and cut out my bunting word 'together'. I was moaning to my hubby as the page didn't look right. After adding the scalloped edges and hole punching them with my big bite it improved slightly, but it wasn't until I decided to hand stitch the bunting down that I started to like it.

To hand stitch it I glue-dotted the bunting into place first, then drew a pencil line where I wanted the stitching to go. I paper-pierced little holes all the way along the line so the paper would be easy to get the needle through, and I rubbed out the pencil line so it wouldn't be visible later. Then I back-stitched all the way along.


I like the fact it gives the layout a personal, home-made touch, as our wedding was all about pitching in and doing it ourselves (we had no caterers, instead doing all the food ourselves, and made all the decorations and favours etc except the flowers!).

For a final touch, as the page was looking a bit flat, I added some flowers to the top right corner. I love the simplicity of the 'family' brad, as it says it all really!


Hope you like it! I was suprised how much I did by the time it was finished. It's got all the wedding colours in, and incorporates the vibe of the day: handmade but glam! And all about spending good times with close family and friends. So I'm happy with it!

Gotta go and play with my little girl now as she's getting seriously bored. I'm not sure how much I'll get done of the crop party today as my babysitters have disappeared to Oxfordshire! But if you have a spare moment, head over to shimelle.com, there's some serious inspiration going on this weekend!

x

Friday 16 April 2010

cupcake cravings

So it's the Shimelle.com online crop party this weekend, with challenges every two hours during the day. The first was 6pm this evening and it was to create something using the theme of cupcakes. It's a great theme, it really is, as cupcakes are pretty and lovely, but man oh man has it been pushing my diet will power to the limit! I've been looking at other people's projects, making my own, and chatting online to some of the crop participants, and all the pics and talk of cupcakes have been driving me crazy! I've managed to resit so far though!

I made an A6 Happy Birthday card. I had to create my own cupcake element as I didn't have any shop bought ones:


I cut the cake base and top out of scraps of card, then coated the pink top with Anita's clear gloss and sprinkled on some pink seed beads. Whilst it was drying I leant on it accidently and got a sticky elbow! Once it was set I added the pink button and tied on the ribbon, and stuck it with tape at the back. Ta Da!

The card was made using scraps of card and paper from my stock, inc some that came free with magazines, so it was stash busting and low cost:


I need to think of a girly-girl to gift it to now, one that appreciates the cheeky message stamped inside:


Sorry about the poor colour quality of that one, I'm not good at taking photos at night - the card is white in reality.

I think I'm gonna skip the challenge from 8pm as it's to win woodgrain products which don't 'call' to me! But the next challenge is due at 10pm, and as that's in ten minutes time I need to tidy my desk up. I did manage to sort it out like I had hoped to as part of my 'pocket-sized plans', but after making that card here's how it looks:


We're also watching the new Star Trek movie tonight as a friend lent it to us, so I'm busy busy busy! Keep an eye out for more crop party posts to come!

x

Monday 12 April 2010

Pocket-size plans


I've decided to do a weekly feature: Pocket-size plans. I'm frustrated at getting no-where with things, and I know full well that it's because I try to do too much at once, and they are often things that aren't achievable very quickly. Like writing a children's novel for example (a project that's been going on for at least 6 years!). It keeps me awake at night thinking of all the things I want to accomplish (this includes housework. I lie awake in bed feeling guilty that I haven't mopped the kitchen floor - seriously).

I know it's silly to try and do too much, and then punish myself for not accomplishing anything. After all I do have a toddler to care for (and a husband who's almost as helpful as a two year old). So I'm going to try and tone it down - to aim for a couple of little goals each week that are realistic. Hopefully I'll complete some of them, and therefore get more sleep!

So each week, hopefully always on Monday but maybe on Sun / Tues sometimes, I'll have a list of a few things I want to complete that week. The number of goals will be carefully chosen, taking into account the enormity of the task and what other stuff I have going on in my life that week. Some of them will be craft projects, some housework, and there will be a few random things along the way too I'm sure. I hope you'll find it interesting following me on the journey and maybe inspiring you to tick off a few aims of your own.

Week One: This week I will:
  • Update my blog header and background
  • Prep my scrap-stuff / desk to take part in the Shimelle.com online blog this coming weekend
  • Make my sister-in-law a birthday card
  • Clean out the cupboard under my sink
  • Vacum-pack our thick winter jumpers and put them in the loft.
I'll let you know how it goes...

x

escaping the house

At the start of winter I love the cool crisp days, even the wet and windy ones; I go into hibernation mode and do lots of baking, start making christmas presents, and love the excuse to stay in and watch movies. But by now the cabin fever has set in, and days when it's too wet or too cold drive me crazy.

So this last weekend was lovely. At last it feels like spring is finally here. Saturday was gorgeously warm, a beautiful day to chill out in the garden and go for a long walk:


Even sunday, when the wind got nippy again, we still managed to picnic on the beach (wearing thick coats and scarves mind you!)


We managed to build sandcastles and kick a ball about for a bit, with me and my pal Rosie even rushing barefoot into the sea to get buckets of water for the moat (verrrrrry cold!!) My little girl seemed to be having a good time, though she asked to go home a couple of times which has never happened before, then when we went to go home she said 'no, no go home'! Do children ever get easier to figure out?


Here's hoping for many more days out and about!

x

Sunday 11 April 2010

Rocky Road Muffins Recipe


I posted the pic of these muffins last week, and Debs requested the recipe so here it is! It's out of a book called 1 mix, 50 muffins by Susanna Tee; we've tried a few of the muffins out of the book and they've all been delicious, so if you see it - buy it!

These ones go particularly well warm with vanilla ice cream (and if you're feeling extra naughty, squirty cream and chocolate sauce too, mmm!)

The only other thing I will say about the recipe is that it takes a really long time to cut up the 50g mini marshmallows, so see if you can get the super teeny marshmallows instead to save yourself the bother!

Rocky Road Chocolate Muffins

Makes 12

  • muffin cases or oil/butter to grease tin
  • 225g / 8oz plain white flour
  • 55g / 2 oz cocoa powder
  • 1 tbsp baking powder
  • pinch salt
  • 115g / 4oz caster sugar
  • 100g / 3 and a half oz white choc chips
  • 50g / 1 and 3 quarter oz white mini marshmallows cut in half
  • 2 medium eggs
  • 250ml / 9fl oz milk
  • 6 tbsp sunflower oil or 85g / 3oz butter melted and cooled
  1. Preheat oven to 200 degrees centigrade, 400 farenheit or gas mark 6. Prep cases / tin. Sift together flour, cocoa powder, baking powder and salt, then stir in sugar, choc chips and marshmallows.
  2. Lightly beat eggs in seperate large bowl and then beat in milk and oil/butter. Make a well in dry ingredients and pour in beaten liquid ingredients. Stir in gently until just combined - do not over mix.
  3. Spoon mixture into tin and bake for approx 20mins until risen and firm to the touch.
  4. Leave in tin for 5 mins and then serve or transfer to wire rack to cool.

I have kept these in a large tuppaware for a few days and they still been yummy - especially re-warmed in oven / microwave.

If that all wasn't enough to make you drool, here's a pic of some gingerbread we made this afternoon:


Hope you're all having a lovely weekend!

x

Friday 9 April 2010

flower brooch on a bday card!

This week it was my friend Rosie's birthday, and I was inspired by a couple of blogs when creating her card. Firstly the fabulous SJ had a tutorial for prima style fabric flowers (see her post here), and I had to try it straight away. My mother-in-law had given me a huge piece of thin lilac fabric which used to be her net curtains, and which I knew was not the right colour to ever be curtains in my house, so I started cutting it up without fear! I ruined a couple of my first circles by burning them too much, but after a few attempts and a bit of stiching I managed to make this:

I didn't have anything to use for flower stamens like SJ did, so after a bit of pondering I made my own out of some wire and seed beads. If you want to make some of your own here's how it goes:

First cut a short length of wire, mine was gauge 24, and thread about 5 seed beads on the end:


Then curl the end of the wire back towards itself:


And wrap it around a couple of times so the seed beads are secure:


I then just wrapped the other end of the wire around between my button and my fabric (which had already been sewn together), making sure it went around a few times and pulled tight so it wouldn't undo. If you have a glue gun you could probably glue the wire to make it extra secure. I also wrapped the wire around different amounts so that the resulting stamen were not all exactly the same length:


I also used clear gloss to glue some seed beads into the centre of my button so it matched the stamen and so you can't see the thread anymore.

When sewing my button onto the fabric I also sewed it to a brooch back, so that the flower can be worn (in the image here the brooch back has been taped to a piece of card so that I could attach it to Rosie's b'day card):


Once I was happy with the flower's result and knew I wanted to give it to my friend, I decided the best way to gift it to her would be as part of her card. I searched for a sketch for inspiration, and SJ's blog came up trumps again, as she directed me to the Fiskarettes forum, and a sketch challenge here. They ask you to come up with a project following the sketch, for the chance to win a subscription to a craft magazine (the competition is open until Monday 12th if you want to give it a go!); the sketch looked fab and I thought I could place the flower brooch in the big rounded rectangle. Here's the sketch:

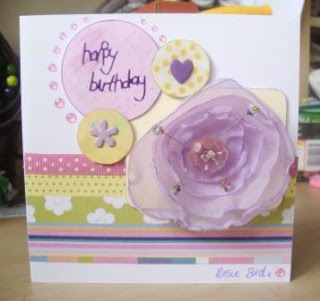
And my finished card:


The circles are scraps of paper that I inked the edge of, pierced a brad through two of them, and then mounted onto foam dots. I then edged the largest circle with Papermania 'pale pink shimmer dots' which look really pretty but are a pain to work with, as they're impossible to pick up with tweezers like I do with adhesive gems! The pink polka dot line is a stip of ribbon, which I adore and am using sparingly on projects as I don't want it to run out! Finally I attached the flower brooch to the card by taping it to a strip of card and then slotting it into two slits on my foam mounted rectangle of cream card:


I was really happy with the card and I think Rosie really liked it too - I've seen her wearing the brooch twice already since tuesday so I think it's appreciated!

I'm off now to enjoy some sunshine. By the way Debs - I haven't ignored your request for the choc muffins recipe - I shall try to upload it over the weekend!

x
Related Posts Plugin for WordPress, Blogger...